
Dynamic Load Balancing With Solar EV Charging: Grid-Tied vs Off-Grid

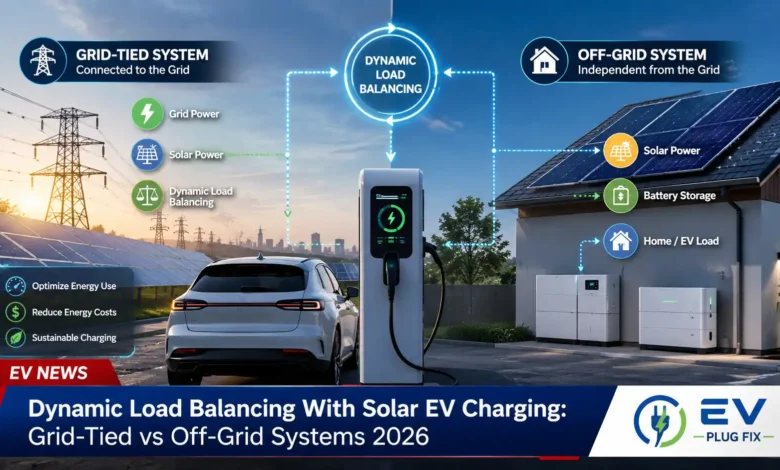
Dynamic load balancing can make solar EV charging more useful by adjusting charger output as building demand and solar production change. It can help a site stay within electrical limits while making better use of locally generated power, but it does not increase the physical rating of a service, feeder, switchboard, transformer or other constrained component.
The main design difference is whether the utility grid remains available. A grid-tied property can draw from the grid when solar output falls. An off-grid site must balance EV charging against its own generation, inverter capability, storage and other loads. A hybrid system adds stationary storage while retaining the grid as another source of energy.
What Dynamic Load Balancing Does
Dynamic load balancing, or DLB, varies the power assigned to EV chargers according to conditions at the site. Instead of assuming that every connected vehicle can charge at maximum output simultaneously, the controller works within one or more defined electrical limits.
A system may monitor the utility connection, building load, solar generation, battery state of charge and individual chargers. It can then increase, reduce, pause or schedule charging according to available capacity and operating priorities, using the same principles described in a typical dynamic load balancing installation.
The U.S. Department of Energy describes managed charging as controlling when and how EVs charge to balance vehicle, building and grid needs. A 2024 NREL-hosted report, Solar Power + Electric Vehicle Charging: Capturing Synergies in Minnesota, also describes Solar Synchronized Management, in which charging is shifted or reduced according to solar production.
Grid-Tied vs Off-Grid vs Hybrid Solar EV Charging
| Factor | Grid-Tied Solar | Off-Grid Solar | Solar + Battery + Grid |
|---|---|---|---|
| Utility available when solar falls | Yes | No | Yes |
| Stationary battery required | No | Usually, for practical continuous operation | Yes |
| Control demands | Typically simpler because the grid can cover shortfalls | Typically greater because generation, storage and loads must remain balanced locally | Greater because the controller may coordinate solar, storage, grid import and charging |
| Solar-surplus charging | Well suited | Possible within local generation and storage limits | Well suited |
| Charging during a utility outage | Not automatically | Possible within local system limits | Possible when specifically designed for intentional islanding or backup operation |
| Architecture commonly worth evaluating first | Properties with suitable utility service | Remote sites or locations where grid service is impractical | Sites with a defined storage, peak-management or resilience objective |
These descriptions are general design guidance rather than standardized engineering classifications. The right architecture depends on the site’s electrical configuration, vehicle energy requirements, tariff, operating priorities and applicable interconnection rules.
How Grid-Tied Solar Works With DLB
In a conventional grid-tied installation, solar reduces the site’s net demand from the utility while the grid remains available when local generation is insufficient. Where the electrical design, interconnection agreement and utility rules permit it, surplus PV may also be exported.
This arrangement makes variable solar production easier to accommodate. If PV output falls, the management system can reduce EV charging, increase grid import within the site’s permitted limit or combine both responses. When PV output exceeds other site demand, a controller can also prioritize surplus solar EV charging where the system and charging requirements allow it.
The controller must protect the actual electrical constraint. If it is managing a utility-import limit measured at the point of connection, increased solar generation may reduce net import and leave more room for charging. If the constrained element is a downstream feeder, bus, switchboard, transformer or other component through which solar and EV power interact differently, a simple net-import calculation may not be enough.
That is why solar array nameplate capacity should not simply be added to the electrical service rating and treated as permanent EV charging capacity. Designers need to consider meter location, current direction, connection points, protective devices and the maximum operating states that the equipment can experience.
Off-Grid Charging Has Harder Power and Energy Limits
An off-grid EV charging site has no utility supply available to cover a sudden shortfall. It may use PV, stationary batteries and power-conversion equipment, although stationary storage is not a theoretical requirement for every possible off-grid design. In practice, batteries are usually needed when continuous or predictable charging must continue beyond the periods when generation can directly support the load.
The controller must keep EV charging within inverter output, battery charge and discharge limits, battery state of charge, available solar generation and the requirements of other site loads. It must also preserve enough energy for future operation.
That distinction between power and energy is critical. An inverter may have enough instantaneous output to run an EV charger, yet the available stored energy may be insufficient to maintain that charging rate for the required session.
When clouds reduce generation or another large load starts, an isolated system may need to curtail charging immediately. A properly designed microgrid can handle those conditions reliably, but it should be sized around realistic vehicle arrival times, required energy, seasonal solar production and the site’s other electrical demands rather than around charger nameplate power alone.
Off-grid charging is therefore most relevant where isolation is part of the project requirement, such as remote facilities or sites where obtaining suitable utility service is impractical or unusually difficult.
When a Battery Helps
A grid-connected solar-plus-storage system adds another resource for the energy-management system to control. A battery can absorb surplus PV, support charging later in the day or reduce grid import when site demand approaches a chosen limit.
Whether storage is worthwhile depends on the job it is expected to perform. Possible objectives include increasing solar self-consumption, shifting charging away from expensive periods, reducing demand peaks, operating within a constrained grid connection or supporting a properly engineered backup system.
Those objectives lead to different battery power and energy requirements. Storage should therefore be sized from the site’s load profile, tariff, vehicle schedules and operating objective rather than simply from the combined maximum rating of its EV chargers.
Solar Does Not Automatically Provide Outage Charging
A conventional grid-connected PV system should not be assumed to keep EV chargers operating when utility power fails. Grid-connected distributed energy resources are required to cease energizing an unintentional island in accordance with applicable interconnection protections.
Continuing to power selected loads during an outage requires equipment, controls, switching and interconnection arrangements designed for intentional islanding or backup operation.
In the United States and other jurisdictions where it is applicable, IEEE 1547, as amended by IEEE 1547a, addresses the interconnection and interoperability of distributed energy resources with associated electric power systems. It was developed in the context of a 60 Hz source and should not be treated as a universal international design rule for every solar-EV installation. The applicable electrical code, utility requirements, interconnection agreement and local regulations ultimately govern a particular project.
Match Charging to Mobility, Not Just Sunshine
Maximizing solar self-consumption is not always the same as delivering a useful charging service. A vehicle with a fixed departure time may need energy even when PV production is low.
A solar-aware controller can therefore combine renewable-energy preference with mobility requirements. Vehicles with long dwell times can absorb variable solar surplus, while vehicles with firm departure requirements can receive priority or a minimum allocation needed to meet their energy targets.
For fleets, useful scheduling may account for arrival time, departure time, required energy, charger availability and site capacity rather than distributing identical power to every plugged-in vehicle.
Demand Charges and Tariffs Need Site Data
Managed charging may reduce electricity costs where a tariff rewards load shifting or penalizes high demand peaks, but there is no universal savings percentage for solar combined with DLB.
Solar can reduce a demand charge when PV production coincides with the interval that establishes the billed peak. It may offer little benefit if the site’s maximum demand occurs after sunset or during weak solar production.
DLB can limit EV charging as total load approaches a configured threshold, while a battery may discharge during selected peaks. The value of either strategy depends on the actual tariff, interval data, building load profile and vehicle schedules.
Which Architecture Should Different Sites Evaluate First?
For a property that already has suitable utility service, grid-tied solar with managed charging is generally simpler than designing a fully islanded charging microgrid. The utility remains available when solar generation falls, while DLB can still manage electrical constraints and use additional PV production when it is available.
Apartment buildings and workplaces should usually begin by determining the capacity of the existing electrical infrastructure, expected vehicle dwell time, billing requirements and likely expansion before deciding how much solar-responsive control is worthwhile.
Fleet depots should put vehicle readiness first. Route schedules, required energy and simultaneous vehicle availability may be more important than maximizing the proportion of charging supplied directly by solar.
Remote properties should evaluate off-grid or microgrid architectures when utility service is unavailable or impractical, but the system must be sized for actual charging energy requirements as well as inverter power. Sites considering stationary storage should first identify a measurable use case such as peak reduction, solar shifting, connection-capacity management or backup operation.
What to Specify in a Solar-Aware DLB System
The essential requirements are the ability to measure the correct electrical constraint, enforce appropriate limits and control charging predictably. Solar, storage, fleet and three-phase features should then be added only where the site actually requires them.
- Essential site metering: Measure the electrical point whose limit the controller is intended to protect rather than relying on an unrelated meter or assumed load value. Correct placement and orientation are especially important when using CTs for load balancing and solar charging.
- Essential configurable limits: The system should support the relevant service, feeder, transformer, circuit or contractual import limits.
- Essential charger control: Confirm that the EVSE and management platform can actually vary, pause or schedule charging in the manner required by the project.
- Essential fallback behavior: Define what chargers do when a meter, controller, network connection or cloud service fails. The fallback should leave the protected electrical equipment in a safe operating condition, for example by applying a conservative local current limit, reverting to a predefined charging profile or stopping charging where the system can no longer verify available capacity.
- For three-phase sites: Determine whether per-phase measurements and limits are needed. Staying within a total three-phase power limit does not by itself prove that every phase is operating within its permitted current.
- For solar-responsive charging: The controller needs either dependable net-power measurement or reliable PV-generation data, depending on the control strategy.
- For battery-backed systems: Integration should include the battery information needed by the operating strategy, such as state of charge and applicable charge, discharge and reserve limits.
- For fleets: The software should be able to incorporate vehicle priorities, required energy and departure times where those factors determine operational readiness.
Local Control, Cloud Control and Communications
Managed-charging systems may make decisions locally, through a cloud platform or through a combination of both. The appropriate architecture depends on the project, but loss of Internet connectivity should not defeat a site’s fundamental electrical protections.
This is especially important in an off-grid microgrid, where maintaining the balance among generation, storage and load cannot depend entirely on an external network connection.
Communications compatibility also needs to be evaluated at the level of implemented functions rather than protocol names alone. SunSpec Modbus defines common standardized parameters and information models for distributed-energy components such as inverters, energy-storage devices and meters. The measurements and controls available in a real installation still depend on the SunSpec models and device capabilities actually implemented by the equipment.
On the charging side, OCPP provides communication between charging stations and charging-station management systems. OCPP 1.6, released in 2015, introduced Smart Charging; OCPP 2.0.1 followed in 2020; and OCPP 2.1 was released in January 2025. Buyers should verify the specific OCPP profiles and optional functions implemented by both the charging station and CSMS, and check the applicable Open Charge Alliance certification scope where certification is required.
OpenADR addresses standardized exchange of demand-response, price and other flexibility signals among energy providers, aggregators and customer-side systems. It can form part of a wider energy-management strategy but serves a different role from charger-to-management-system communication.
ISO 15118 addresses communication between the EV and EVSE. ISO 15118:2022 defines messages and sequence requirements that include bidirectional power-transfer functions, and Amendment 1:2026 adds further provisions. Those capabilities are usable only where the relevant vehicle, EVSE and surrounding system all provide compatible support.
Does V2G Change the Design?
Bidirectional charging can make a compatible EV another controllable energy resource. Instead of only reducing charging during a constrained period, some systems may be able to export energy from participating vehicles for building, microgrid or grid-support applications. The differences among these use cases are covered in more detail in this guide to V2L, V2H and V2G.
That does not make every EV equivalent to a stationary battery. Vehicle support, bidirectional EVSE, interconnection approval, program rules and driver requirements all affect what can actually be done. A fleet vehicle should not be discharged for site support if that would prevent it from completing its next required trip.
Essential Questions & Expert Answers
Can dynamic load balancing let one electrical service support more EV charging ports?
It can allow more charging ports to share a constrained supply because they do not all have to operate at their maximum rating at the same time. It does not increase the physical rating of the service, feeder, transformer or other protected equipment.
Can DLB send only surplus solar power to an EV?
Yes, when the system has the necessary measurements and charger-control capability. A project may use strict surplus-only charging or combine a baseline charging allocation with additional power when excess PV is available.
Is a battery always required for off-grid EV charging?
No. An appropriately controlled system can theoretically charge directly from local generation without stationary storage. In practical off-grid installations that need predictable or continuous charging despite changing solar conditions, however, battery storage is usually part of the design.
Is off-grid solar practical for Level 2 EV charging?
It can be, provided the generation, inverter and any storage system can support both the required charging power and the total energy the vehicle needs while also supplying other site loads. The charger’s maximum rating alone is not enough to determine whether the system is adequate.
Does a grid-tied solar-plus-battery system automatically charge EVs during a blackout?
No. Outage operation requires an architecture designed for intentional islanding or backup service, including suitable power-conversion equipment, isolation, controls and interconnection arrangements.
Is OCPP required for dynamic load balancing?
No. DLB can also be implemented through proprietary or local control methods. OCPP is useful when interoperable communication between charging stations and a charging-management system is important, but version support alone does not guarantee that every optional smart-charging feature is implemented.
Can solar capacity simply be added to the site’s service capacity when sizing EV charging?
No. Whether solar creates additional charging headroom depends on the location of the electrical constraint, where PV is connected, how power flows through the installation and what the controller measures. The protected equipment must remain within its actual rating under every relevant operating condition.
Bottom Line
Where suitable utility service already exists, grid-tied solar with managed EV charging is generally the practical default. It allows the charging system to respond to building demand and solar production while retaining the grid as a source when local generation is insufficient.
Off-grid charging is primarily justified by remote locations, unavailable utility service or other conditions that make grid connection impractical. These systems require closer coordination of generation, inverter power, stored energy and vehicle demand, with sizing based on real charging requirements and expected operating conditions.
Solar-plus-storage can add valuable flexibility, but the battery should solve a defined problem rather than be added automatically. In every architecture, the first task is to identify the real electrical bottleneck and the energy vehicles must receive. Dynamic load balancing should be designed around those constraints, with solar and storage used where they measurably improve the result.
Source Transparency
This guide was checked against technical material from the U.S. Department of Energy and National Renewable Energy Laboratory on managed and solar-synchronized EV charging; SunSpec Alliance material on standardized DER information models; IEEE information covering IEEE 1547 and IEEE 1547a; Open Charge Alliance documentation for OCPP 1.6, OCPP 2.0.1 and OCPP 2.1; OpenADR Alliance material on demand-response and distributed-energy coordination; and ISO information for ISO 15118:2022 and Amendment 1:2026. Generic savings percentages, fixed payback claims, unsupported equipment-life estimates and market-wide claims about system complexity were intentionally avoided because those outcomes depend on the site, tariff, equipment, jurisdiction and operating strategy.